Why you should choose hiking boots over other footwear designed for hikes
Best hiking boots - June 2018
Personal choice and need. Choosing what to wear for a hike is mainly your decision. Moreover, that choice is affected by your own needs—from the flexibility of your ankles, the size and width of your foot, the load you carry, the terrain you tackle and to your comfort.
Water protection. Puddles of water, streams, rivers and muddy trails are just some of the things you will encounter when hiking or backpacking. To keep your feet dry throughout the trip, your choice is to get hiking boots with a waterproof upper or liner. Hiking boots with a bellows tongue also prevent water from entering in case you are crossing a path with a water level higher than your ankles.
Support. Hiking boots are necessary particularly when carrying a heavy pack. Ample ankle coverage can protect you from a sprain, especially if you have weak ankles. Hiking boots or backpacking boots have stiffer midsoles which enable you to tackle challenging trails safely. They are also incorporated with shanks that add support.
Critter protection. When you go off trail, the possibility of encountering snakes and other crawling critters is high. So, having a footgear that shields you all the way up to your ankles (or higher) can keep you safe from bites that can be life-threatening.
Why would I go for hiking boots instead of hiking shoes?
Some situations require the need of hiking boots instead of trail shoes. Here are some of them:
When you are heading out on aggressive hike with too many obstacles such as rocks and roots
When you have weak ankles and may need mid-cut or high-cut models to give you support
The trail is challenging because of uneven ground
You are a backpacker or trekker carrying a moderate to heavy load
You prefer footwear that can provide you with support and stability because you are an occasional hiker or a beginner
When you are going for hikes during winter
Considerations in getting your future hiking boots
The kind of trail. Hiking trails have levels of difficulties, so it is essential to choose your hiking boots based on the path you are going to tackle. Remember that the weight on your feet has an impact on the energy you need to exert, so always check if the product is suitable for your purpose. You may go for the lightest shoe, provided that it has the features you need.
For well-maintained trails with a light pack, go for mid-cut models. Choose boots that combine textile and leather or split leather. If you are likely to encounter wet elements, go for a boot with a waterproof lining.
For backpackers and hikers taking on challenging terrain, go with boots with ankle coverage. Unless you are a hiker with a stable footing, you have to prioritize getting support and protection. There are hiking boots with half-length shanks and midsoles tapering towards the forefoot that has sufficient rigidity and flex, simultaneously.
Durability. Hiking boots require a reliable level of durability. The varying ground conditions can put your boots to the test. Muddy, snowy, rocky, wet grounds—you name it. Your hiking boots should be able to surpass these without breaking after a few hikes.
Activity. In selecting your next hiking boots, you have to consider the type of activities waiting for you on your adventure. Will there be a lot on dry, dirt trails on your way? Does your hiking path involve crossing streams or rivers? Note that there numerous types of hiking boots that are made to cater to various needs of hikers. Here are a few points to consider:
When hiking during the summer, you need to get the shoe that will give you breathability. Otherwise, your feet will suffer from the heat and will get all sweaty.
When hiking during colder months, getting insulated boots will help you get through low temperatures.
Traction. After determining the activity and the trail, it's important to get boots that have outsole technologies well suited to the trail you're going to take. Hiking footwear companies have created innovations that aid in downhill slopes, rocky paths, muddy trails and other challenging grounds.
Upper Construction. The construction of a hiking boot’s upper plays an important role in the footgear’s performance. You need to determine the kind of hike you’re planning to take so you can choose the appropriate upper configuration. Here are some of the upper materials used in hiking boot:
Leather. A good chunk of mid and high-cut footwear models use leather as its main upper material due to its innate toughness and resistance to the elements. Various leather hiking boots use variants of this material, with full-grain leather being the sturdiest. On the other hand, there are some hiking boots that pair leather with mesh or textile fabric for weight reduction and flexibility.
Synthetic. Several footwear brands offer hiking boots with synthetic uppers. This material is processed without the use of animal products. Most hiking footwear models with this kind of upper are known to be lightweight and flexible, yet less durable than leather hikers.
Knit. These are your hiking boots that have a knitted upper. Knit hiking boots are engineered to be lightweight and provide a glove-like fit for less demanding trails. Also, the upper of select knit hikers are reinforced with overlays to enhance their durability.
Choosing the best hiking boots that fit well
How should hiking boots fit?
When fitting hiking boots, it is vital to ensure the fit is not too loose, not too tight. How? By trying these methods.
With your hiking boots unlaced, slide your foot inside. Push it forward as far as it goes inside the boots. Once settled, insert your index finger at the heel area. A finger width should be enough. Now, lace up the boots and walk it around without wearing socks. Feel for any hard or bothersome areas. Afterwards, try it again with socks on. It should be comfortable, non-constricting and snug.
Walk on an inclined surface. This tests the snugness of the boots. When you go up the board, observe for any heel lift or constraint on the collar. When you go down, observe if your toes jam the front of the boots.
Bring your socks in the store. Bring the socks that you intend to wear with the hiking boots you are going to purchase. Do not use cotton fabric as it does not offer any insulation and retains moisture. It can leave you with cold feet on the terrain. Wool or synthetic is a better choice of material for socks.
Take your orthotics or preferred insoles with you. Most of the time, consumers are not satisfied with the default insole of the hiking boots. Do not fret if the volume is too high or too low for you. Remember that brands manufacture their boots for hiking using different lasts and this can affect how your feet fill the boots’ volume. If it did not work with your insoles, try another pair of hiking boots.
Fit your future hiking boots late in the day. Your feet tend to swell after a day full of activities. It happens too when you are hiking, so to get the best fit, try your boots in the afternoon.
How do I break them in?
Before you set foot on that trail, ensure that your feet are in sync with your hiking boots. Every boot requires a different break-in time. Some of the lightweight hiking boots feel comfortable right out of the box whereas those heavier boots may take some time. If you have the latter, do not hasten this process to avoid problems on the trail.
Start small. Wearing full-grain leather hiking boots for the first time can be tiresome. They are heavier and stiffer than other boots. Start breaking them in inside the house by doing chores. Do not forget to wear socks as if you are going on a real hike. Every step you spend with your hiking boots lessens the chances of hurting your feet when it's finally time to hike in them.
Gradually increase your miles. Once you feel that you are comfortable with the hiking boots inside the house, go for a walk in the park, to the nearest shopping mall or around town. Do not use the hiking boots abruptly to walk for a hundred miles, especially if you feel that it is still a bit stiff. Walking outside add heat, pressure and moist (sweat) inside your hiking boots so look out for blisters.
Conquer that trail. As soon as you feel that the hiking boots are ready for that adventure, you may go on a day hike or an overnight trip.
How tight should I lace my hiking boots?
Lacing your hiking boots for optimal comfort mainly depends on your preference. Just make sure that you are lacing it just right. When you lace up your boots too tight, it can impede your circulation thus making your hike wearisome. Remember that your feet swell the more active you are during the day. You can also experience foot fatigue too soon. On the other hand, when you lace it too loose, it can cause blisters due to frequent rubbing. Just aim for a snug fit.
Uses of hiking boots
Day hiking boots. These are your lightweight yet supportive boots. They offer ankle support and can carry a light load. It is a crossover of your low-cut hiking shoes and backpacking boots. Some day hiking boots require little-to-no break-in period.
Backpacking boots. These are your sturdy and burly boots that are ideal for multi-day backpacking trips while carrying a heavy pack. Their midsoles are usually stiffer than your day hiking boots and require a good amount of break-in period. Their outsole feature more aggressive lugs and treads. Also, there are backpacking boots that are crampon compatible.
Winter hiking boots. Your day hiking boots or backpacking boots do not have all the necessary features you need to conquer a hike during winter. Winter hiking boots have layers that are customizable and offers insulation. There are single layer and double layer insulated boots. These are further categorized according to the complexity of winter hikes. Winter hiking boots are usually compatible with crampons, microspikes and snowshoes.
Waterproof hiking boots and their use
Do the terms water-resistant, waterproof and water repellent ever confuse you? Here is a quick rundown.
Water-resistant. The most basic type of water protection. The material is sometimes coated with a light substance that makes it able to survive light water encounter.
Water repellent. A notch up with water resistant as it contains elements that make it hydrophobic. It is able to withstand a much denser contact with water.
Not penetrable by water, as defined.
Why do I need waterproof hiking boots? What is Gore-Tex?
When you are out on the trail, you are never sure of what you are going to encounter, so having hiking boots that can handle wet and dry conditions is a plus. Some brands use fabrics that offer breathability and waterproofing at the same time.
There are just enough reasons why waterproof hiking boots are preferable. When crossing streams, you do not need to be afraid about walking through the puddles. As long as the water does not go beyond the top of the boots, you are safe.
A popular technology that has been adapted by numerous brands is the Gore-Tex membrane. Through innovation, developers from the Gore-Tex brand were able to offer lightweight and improved protection. They have variants that also offer moderate insulation that allows users to enjoy a wider range of outdoor conditions. Gore-Tex has made their fabrics adaptable to different outdoor gears.
Some boots are made with a mesh upper. This fabric gets soaked in water quickly. However, they are designed to be fast drying.
How do I waterproof my hiking boots?
When you care for your hiking boots, you extend its service life. Even the best waterproof hiking boots need attention especially when they require reapplication of the waterproofing treatment. You do not need to waterproof your boots after every use, though. One cue that users look out to is when water does not bead up on the surface of the boots.
Clean your boots thoroughly. When it is time to reapply waterproofing treatment, you have to ensure that the boots are strikingly clean. Remove the laces as well as the insoles and clean them separately. Manufacturers suggest using a soft-bristled brush in removing stubborn stains so as not to damage the material if you are brushing it rigorously.
Apply waterproofing treatment as necessary. It is crucial that you consult with the brand’s recommended treatment for your hiking boots. You may apply it while the boots are still damp for better absorption. If you have a hiking boot with a Gore-Tex upper, do not use waterproofing waxes or greases as it can hinder the breathability of the boots.
Dry the boots. After reapplication of waterproofing treatment and before you keep the boots, ensure that the hiking boots are thoroughly dry. The laces, insoles and insides of the boots must be dried. A general rule is never to expose the boots to extreme heat or direct sunlight. If the interior of the boots are still soaked, stuff some newspapers to help absorb moisture and change as necessary. Use of fan to assist in drying is okay too.
Can I use my waterproof hiking boots for snow?
Yes, you can use your waterproof hiking boots when traversing snowy terrains. However, you have to make sure that your boots offer insulation, are compatible with crampons/snow traction devices, and have a secure fit. If you hike more on snow than a regular terrain, snow boots or winter boots can also be an option for you.
Lacing the boot
Remember that every foot is unique. It varies in shape, size and volume. The default lacing of your footwear may not be the best one for you so it's important to study and apply different lacing techniques. Foot volume and the height of your arches are some factors on where to best place pressure and tension when you lace your boot.
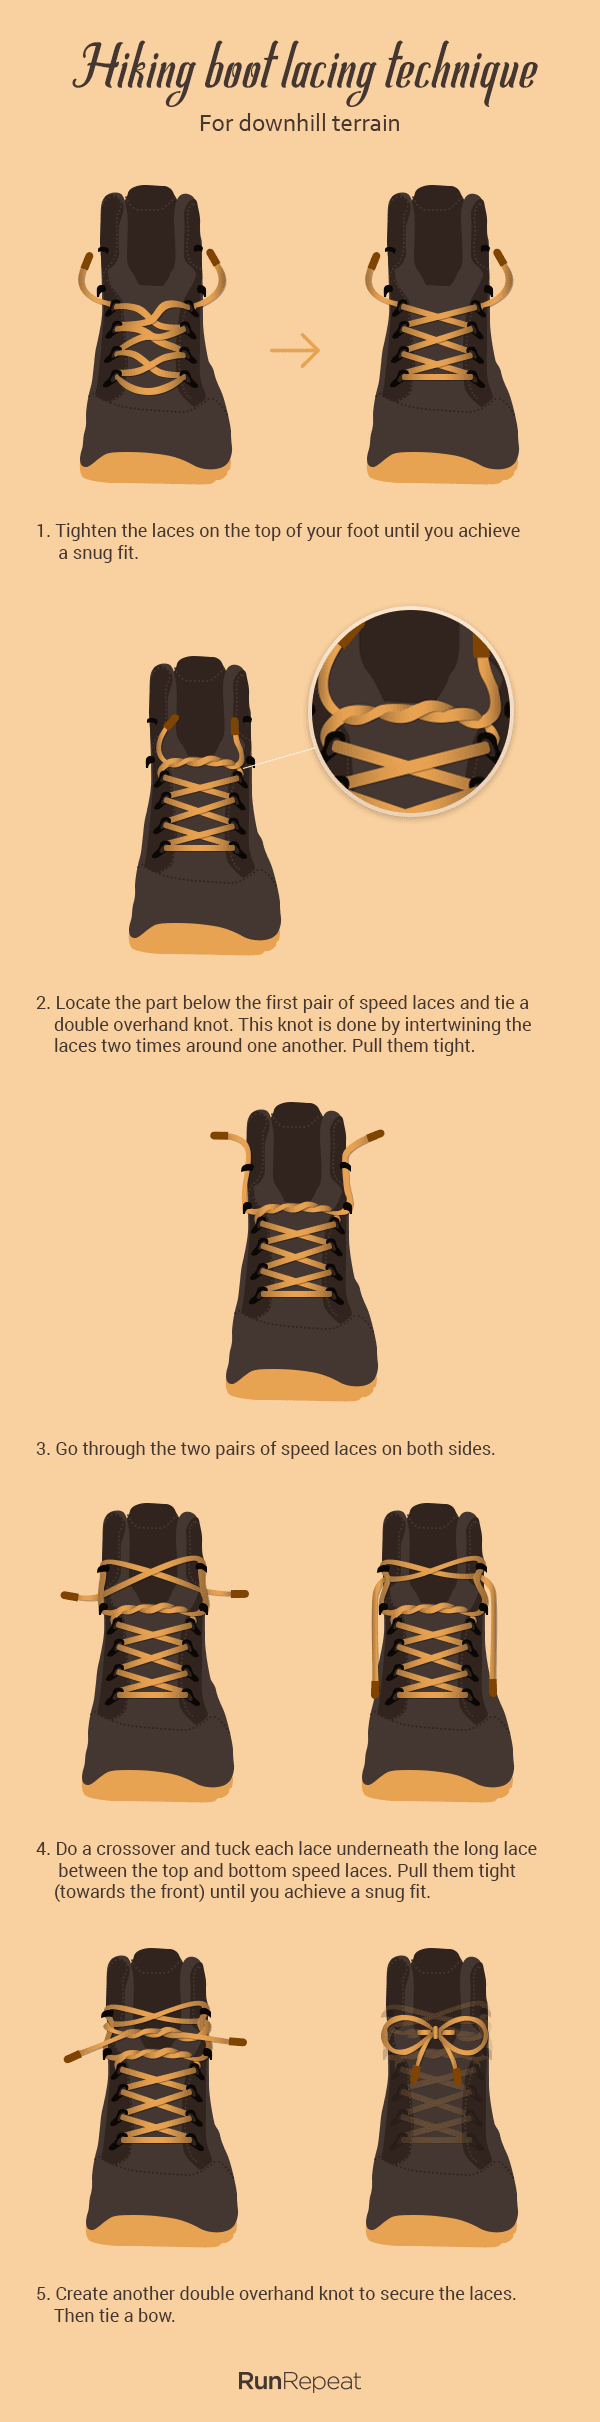
How do I tie my boots for downhill terrain?
When you go downhill, there's a possibility of smashing your toes to the front of the boot. When this happens repetitively, you might end up with a black toenail. The way to prevent this is to secure the ankle to the back of the boot. Here is the procedure:
Tighten the laces on the top of your foot until you achieve a snug fit. Doing so will prevent blisters.
Locate the part below the first pair of speed laces and tie a double overhand knot. This knot is done by intertwining the laces two times around one another. Pull them tight.
Go through the two pairs of speed laces on both sides.
Do a crossover and tuck each lace underneath the long lace between the top and bottom speed laces. Pull them tight (towards the front) until you achieve a snug fit.
Create another double overhand knot to secure the laces. Then tie a bow. You can add another knot to make it more secure.
Notes:
If you have another pair of speed laces above, just lace normally, then tie the laces.
The forefoot region usually has four eyelets. The first double overhand knot is to be tied above the last eyelet of the forefoot zone. This creates a locking tension on two areas—one for the forefoot region and another for the area above the ankle.
Aside from preventing the ankle from moving forward, this lacing technique also prevents heel slippage. As a result, you won't get blisters around the heel.
Here's a visual presentation of the steps:
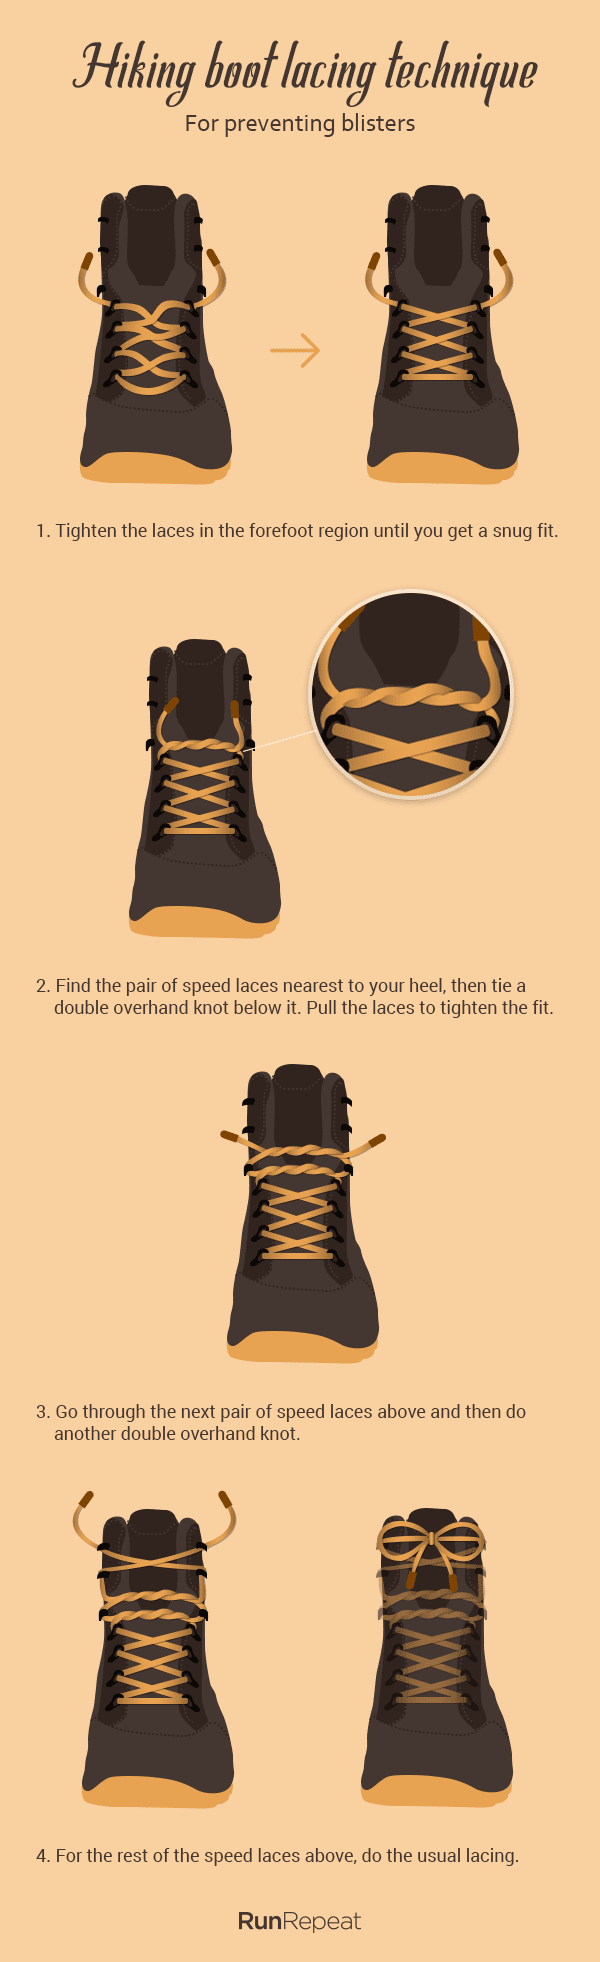
How do I lace my boot to prevent blisters?
Friction causes blisters. And one of the main reasons why you get these uncomfortable, serum-filled bump is the heel going up and down, rubbing against the internal walls of your boot. The procedure mentioned above is one way of preventing heel slippage. And there is another lacing technique (popularly known as the surgeon's knot) to address this problem. Follow these steps:
Tighten the laces in the forefoot region until you get a snug fit. Doing so will prevent blisters on top of your foot.
Find the pair of speed laces nearest to your heel, then tie a double overhand knot below it. Pull the laces to tighten the fit.
Go through the next pair of speed laces above and then do another double overhand knot.
For the rest of the speed laces above, do the usual lacing.
Here's the illustration:
Hiking boots and common foot problems
Some outdoor enthusiasts get foot problems, keeping them from the enjoyment of hiking. What are those common foot issues and what do the experts say?
Plantar Fasciitis. This is extreme heel pain. When plantar fascia (the ligament that runs from the heel to the toes) weakens or gets irritated, hikers experience a stabbing pain in the back of the heel. There are a number of reasons why this happens. One of those reasons is due to ill-fitting boots or shoes. Numerous claims have been made on how plantar fasciitis can be resolved by arch support. However, some experienced hikers and medical experts indicate that it is a myth. The reason behind was since the pain comes from an inflamed (itis means inflammation) plantar fascia, then any pressure you put on it causes more pain. Hence the support should be on the heel and ball of the foot, not on the arch. On the other hand, some experts recommend using hiking boots with a right amount of arch support to minimize pain (read our article on arch support studies).
Bunion. This is the bony prominence on the joint at the base of the big toe. It is believed to be hereditary and women are more likely to develop bunions than men due to the frequent use of tight-fitting and high-heeled shoes. When purchasing hiking boots, it is suggested you consider a pair that has a rounded, roomy toe box. A wide toe box can improve comfort, alignment of the toes and balance especially if you have bunions. A lace-up closure is also recommended as you can adjust the fit.
Hammertoe. Sometimes coined as claw toe or retracted toe, this usually involves a bent from the second to the fourth toe. It forms a “v” like shape. Over time, the toe may become fixed in this position and can potentially lead to having callus formation, limited range of motion on the affected toes and foot pain. Hammertoes are usually caused by prolonged use of ill-fitting shoes. Wide hiking boots are the preferable footgear in this condition as this would not pinch or restrict the movement of the toes. There are conservative and surgical strategies to correct hammertoes, too.
How do I ensure happy feet with my hiking boots?
Improved mobility and muscle strength. When it comes to ensuring happy feet on the trails, you should not rely solely on your hiking boots. Before setting foot on the trail, make sure that you and your feet are ready for the challenges on the terrain. Gradually strengthen your muscles, so you do not need to depend much on your hiking boots.
A precise fit and sizing. It is important to get the best fit and size for you. Doing so will prevent many problems—volume issues, heel lift, toe jamming and blisters. With ill-fitting boots, however ready you are on the trail, they can still affect your performance on the trail.
Break-in period and smooth transitioning. If this is your first time hiking, you may have been used to flip-flops or sandals that are categorically lightweight and requires virtually no breaking in. This is the reason why you need to spend a reasonable amount of time with your hiking boots before embarking on the trail; you are giving them the chance to work in sync. Likewise, you get to determine which lacing system works for you and which insole meets your needs.
Spot hot spots. Even if you spent a reasonable period of breaking-in your boots, there is still an infinitesimal chance of developing blisters. While you still have the chance, take note of the hot spots, research and experiment on how to mitigate them. When on the trail, be prepared by bringing some tape to cover the hot spots to avoid developing blisters.
Other considerations. Trim your toenails properly. One tip is to clip it in a straight cut instead of a slightly curved cut. It helps reduce having in-grown toenails. Wear comfortable socks, preferably not cotton. Wool or synthetic socks can serve you better.
Frequently asked questions
Can I use my hiking boots for running?
Running requires a featherweight footgear that focuses on how the foot extends. There are hiking boots that offer that kind of support, but not all. If you are going to use your hiking boots for running, be prepared for some drawbacks. No matter how lightweight your hiking boots are, they still have that “extra” weight compared to a running shoe. They are also made to be a bit stiffer and can limit your ankles’ range of motion.
I have very sweaty feet. How can I prevent my hiking boots from getting smelly?
Hikers are prone to having profusely sweaty feet due to the strenuous activities one may encounter on the trail. Applying antiperspirants can help keep your feet dry. Some use astringent rubs, which contain a chemical that temporarily closes pores, thus reducing perspiration. Avoid using foot powders (with cornstarch) or baby powder as it absorbs sweat and is a good breeding ground for fungus when damp. On a side note, if you are not hiking or doing anything active, yet your feet still sweat a lot, you may have a medical condition (plantar hyperhidrosis), so it is best to consult with a doctor. Even though you have sweaty feet, you can avoid smelly hiking boots through appropriate skincare and boots maintenance, an effective routine and regular change of socks.
Are hiking boots better in providing ankle support?
The answer to this question lies on how one defines ankle support. One cannot say that because he/she did not have any ankle injuries with his/her mid-cut or high-cut hiking boots, it means that it is better in providing ankle support. There are also hikers who use low-cut hiking shoes and did not experience ankle injuries, too.
It may take lots of trial and error but finding the hiking boots that provide ankle support depends on your preference. There are a variety of terrains, hence the variation in footwear. You may find low-cut hiking shoes to be supportive than mid-cut hiking boots or vice versa. It may help you a lot if you develop and strengthen your muscles while on the search for your most supportive hiking boots.
Can I use my work boots for hiking? Or vice versa?
Hiking boots and work boots vary significantly in their features and design. Work boots are structured to protect users in the workplace—mining, plumbing, construction, etc. It prioritizes safety over comfort and is heavier because of their steel toe. Some work boots are also flame and chemical resistant. Hiking boots, on the other hand, perform best on the trail. It may be able to offer some level of stability and security. However, it cannot give the safety features you need for work. There is a reason why they are called work boots and hiking boots.
Can hiking boots be resoled?
Yes, hiking boots can be resoled but not all. It depends on how the boots re constructed. There are numerous ways of shoe construction and the most common techniques used are cementing and Goodyear welting. It differs on how the upper, midsole and outsole are attached. As these types of construction vary in materials and skills required in completing one, the cost of resoling differs too. Resoling of a cemented outsole is cheaper than Goodyear welt, though.
When do I resole my hiking boots?
If you have been with your hiking boots for quite a long time now, have you ever thought of having it resoled than buying a new pair of hiking boots? Sometimes, hikers tend to have their boots resoled instead of purchasing a new one as they already developed a sentimental value towards it.
Check if the outsole is worn out. If you have already invested a thousand miles on your pair, the outsole will inevitably show some wear. Check if there are holes, punctures or breakages on the sole. Did it wear out unevenly? If yes, consider resoling it as this can lead to serious gait problems in the future.
No grip or traction. Sometimes, traction from the outsole is impeded by dirt and mud that were stuck for a long time. If after thorough cleaning and inspection you still find that the hiking boots are losing its traction, it is wise to study the lugs and treads pattern. Are they showing signs of thinning? This could be the reason why your hiking boots are losing its grip.
Sole separates from the boots. Imagine yourself hiking and in the middle of your journey, the sole of your hiking boots separated and gluing it is way impossible. It is a hassle for you and your group. So before you set foot on that trail, inspect the soles first. Check if there are signs of separation from the upper to the midsole or the outsole.
If the cost of repair for your hiking boots exceeds the price of a new pair, contemplate which option is better. Always check with your manufacturer if your boots are resolable.
15 best hiking boots
The North Face Back-To-Berkeley Redux Leather
Salomon Quest 4D 3 GTX
Adidas Terrex Free Hiker
Lowa Renegade GTX Mid
Danner Mountain 600
Timberland Mt. Maddsen Mid Waterproof
Vasque Breeze III GTX
Salomon Quest Prime GTX
Columbia Newton Ridge Plus II Waterproof
Scarpa Terra GTX
Vasque Talus Trek UltraDry
Salomon X Ultra 3 Mid GTX
Merrell Moab 2 Mid GTX
Adidas Terrex Swift R2 Mid GTX
Merrell Moab 2 Mid Waterproof
Author
Paul Ronto
Paul loves adventure. Over the past 20 years, he has climbed, hiked, and ran all over the world. He’s summited peaks throughout the Americas, trekked through Africa, and tested his endurance in 24-hour trail races. He has worked in the outdoor industry as a whitewater and hunting guide, gear tester, copywriter, and outfitting specialist at places like The National Outdoor Leadership School, No Barriers USA, and Sierra Trading Post. He has been quoted in NYMag, NBCNews, and Business Insider to name a few.
paul@runrepeat.com
This shoe has recently been added to RunRepeat. There are still not enough reviews for us to assign it a CoreScore.
CoreScore A score from 1 to 100 that summarizes opinions from users and experts. The average CoreScore is 78.
More...


 €290 €147 Save 49%

 €210 €108 Save 49%


 €240 €106 Save 56%


 €190 €87 Save 54%
 €170 €96 Save 44%
 €300 €150 Save 50%
 €280 €196 Save 30%
 €190 €69 Save 64%
 €190 €101 Save 47%
 €250 €140 Save 44%
 €220 €103 Save 53%
 €250 €134 Save 46%
 €300 €219 Save 27%
 €380 €186 Save 51%
 €370 €216 Save 42%
 €180 €95 Save 47%
 €140 €88 Save 37%
 €310 €207 Save 33%
 €180 €87 Save 52%
 €410 €196 Save 52%
") €250 €103 Save 59%
€250 €103 Save 59% €220 €162 Save 26%
 €250 €135 Save 46%
 €310 €141 Save 55%
 €200 €119 Save 41%
 €260 €152 Save 42%
 €260 €163 Save 37%
") €230 €120 Save 48%
€230 €120 Save 48% €290 €201 Save 31%
 €230 €113 Save 51%